


Building Back-Loaded Horn Speakers for Fostex fe166es-r Drivers
Zowie! Yeah man! Dig it!
MUSIC!
Pop! Zing! Pow!
Zoom! Snap!
Sotto voce... Crescendo!
Ahhhhhhh!
A lot of pieces to glue, with precision.
Yup, I bought a pair of those special edition Fostex FE166ES-R back in January 2005 and built a back-loaded horn (abbreviated BLH) for them, and I am now a happy horn owner.
In 2004 I built a pair of the Adire HE12 speakers and learned a lot - last year it was horn time and I learned even more... Those are the Adires on the left below, and the back-loaded horns are on the right.
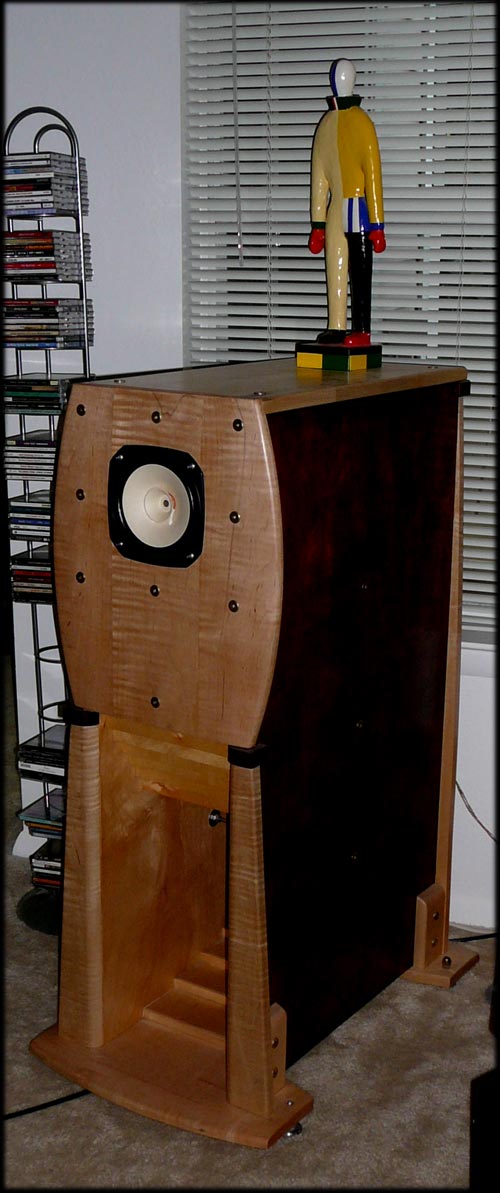
These are based on the Fostex 'factory' plan on the Madisound site - and they are deceptively big, a little more than two feet deep. I doubled the top and back, and added the maple baffle, all are mild deviations from the oiginal Tetsuo Nagaoka plan, as internal sizes were maintained from the plan (except for one correction noted later). *Heavy* suckers - almost two entire sheets of 4x8-3/4 birch veneer ply in each cabinet. Makes you think hard before you start moving these around, or even flipping them over.

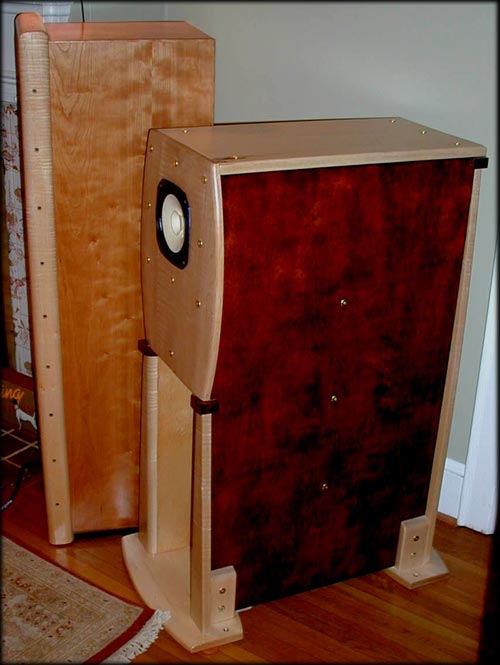
The grain on the side was a challenge, figured veneer with burls and trickly swirly grain - lost a lot of time finishing the sides (twice). All trim is figured maple. Internal braces, such as they are, are also maple. Threaded rods run across the cabinets for additional resonance tweaking.
Local copy of fe166esr.pdf - Fostex driver sheet and backhorn plans
For those of you just starting on this path, well, keep going. It just gets better and better!
Thanks to the late-great Terry Cain for inspiration and advice, to Steve Killian for periodic checkups, to Jim Dowdy for being the DowdyLama that he is, to Fostex for making these schmancy drivers, to the forums for keeping me going, and finally - importantly - to Blithe, who has far more patience for the parade of homebuilt audio through the living room and the evenings and weekends in the shop than I ever expected or deserved!
In this page:
- What's so great about the Fostex FE166es-r?
- Break-in procedure for Drivers
- Quick Evaluation on the Horns
- Construction Pictures
What's so great about the Fostex FE166es-r?
Each year Fostex builds a custom limited edition driver for the Japanese hard-core horn market. In 2004 Madisound, the US distributor for Fostex, finally convinced them to send a few hundred pair over here to the US - Madisound then sold out of the several hundred drivers imported in a few weeks.
The driver is based on a normal Fostex FE166 with some radical tweaks
- Special paper cone with radially aligned fibers, including banana fibers, and a doped silk surround
- Copper-silver alloy voice coil
- Hugely oversized Lanthanum-Cobalt magnet
- Special edition blue metal-flake paint on the frame
Because of the magnet size this driver has a very high 'Q' and can really only be used in some sort of horn. The same 'Q' makes the response rise through the bass and lower midrange, then level out and extend up to almost 18kHz before starting to drop again. This response curve matches well with BLH horn loading - the bass horn behind the driver loads the driver and cuts down on dopple distortion, and a drop in horn efficiency through the mid band can be tailored to match the riding response of the front radiation so that, in theory, you get a relatively flat response at high efficiency and no electrical crossover to complicate things and smear the signal.
In my case it seems to have worked - and there is another bonus in that these drivers are directional - not so directional that your head must be locked in a vise, but enough that some significant room interactions are reduced.
OK, if these are so wonderful, where can I find a pair of drivers?
eBay? As a limited edition driver, they are long sold-out at Madisound, but there are probably a few unused pairs out there sitting in basements that will trickle back onto the market...
Break-in procedure for Drivers
Pretty much everyone agrees that it takes a long time to break-in most Fostex drivers, and the fe166es-r is no exception - I put several hundred hours on them before final assembly of the horns, and they continued to change even after that extensive burn-in.
Re: Getting close with the new Horns...
Posted by fishinjc on May 16, 2005 at 02:48:13
In Reply to: Re: Getting close with the new Horns... posted by Philji on May 15, 2005 at 11:21:30:
I have a pair of these drivers sitting on the shelf. No time to build the recomended cabinets yet.
I would appreciate some more info on your break-in procedure. Thanks
Posted by pRC (A) on May 18, 2005 at 17:51:14
In Reply to: Re: Getting close with the new Horns... posted by fishinjc on May 16, 2005 at 02:48:13:
1) find 4 brass or stainless bolts - 10-32 x 1 inch - and nuts
(use non-magnetic hardware around these drivers to keep them from snatching a part out of your hand)
2) locate 4 soft foam pads about 1 x 1 x 1/2 inch - punch holes through the center of the short sides
3) assemble the drivers face-to-face with the foam between the frames to prevent scratches
4) make up a short cable with crimp-on female spade connectors and pigtails with another set of spades
5) wire up the drivers in series or in parallel, but make sure that they are in opposite phase (one pushes as the other pulls)
6) hook up the drivers to an old receiver or a boombox with speaker-out connections, select a station and start from a low volume to make sure things are wired up correctly!
7) crank the amp, put a box over the drivers, cover the box with a blanket, and leave the room for 4 weeks or so...
If you are truly obsessive you can come back and flip the drivers over a couple of times to equalize stress on the spiders.
(Also need to apply ductseal and felt before soldering the leads onto the connection tabs)
Quick Evaluation on FE166ES-R Horns
Well, they have been in the system now for three and a half days and it's still early in the relationship, but overall I'm really happy with the results. Though there is still some tweaking to be done -
The good stuff:
They make music and are very dynamic. I can't stop listening to them. They sound good on *all* my albums so far, even stuff that was troubling on the Adires. Very enjoyable, they just suck you into the performance. Percussion really jumps out of these things, realistic pop. A bit more efficient than the Adire HE12 speakers... Projects ambiance all around the room, but sitting in the sweet spot you can hear what sounds like studio ambience, which I haven't heard before in this room.
They seem to work well for a variety of music from small acoustic guitar to jazz trios, to Louie Armstrong and bigger bands with vocals, to loud rock (Dixie Dregs - 'Country House Shuffle' from Night of the Living Dregs at high volume, mmmm.), to orchestral works (though I haven't pulled out the Bruckner yet).
They don't need a tweeter.
The Audiophile-speak:
Very wide soundfield. Propulsive. Forward. Sensitive to positioning.
The not-quite-good stuff:
Mild resonance in mid bass, likely from oversized compression chamber with little damping - I'm in the process of gluing egg rock to the bottom of the chamber to compensate for the extra volume of the baffle clearance hole (original design had a single baffle, when I added the maple baffle I had to compensate for the extra cylinder of space behind the driver, and for cutting the original baffle hole out larger to improve sound propagation from the sides of the driver - these have a truly huge magenet for their size). And adding wool felt to the walls of the compression chamber. Will also try some of those Fostex paraboloid 'HP' plastic diffusers inside the horn for effect.
Bass guitar is a touch wooly compared to the best bass I have heard, but it's all there - much bass, no need for a subwoofer. So they won't go as loud as the Adire's - which with those PA drivers could energize the entire house at high volume! Blithe won't be able to listen to the main system in the back yard anymore 8^(.
The Materials List:
- 1 pair Fostex FE166ES-R limited edition drivers
- 4 sheets of 3/4 inch 4x8 birch ply
- Many board feet of maple and figured maple
- 2 bottles of Elmer's urethane glue
- 2 pair Edison-Price copper binding posts
- 2 tubes of clear silicone caulk
- 12 feet Belden 18 ga magnet wire
- 5 bottles of Minwax oil finish
- A wall of bar clamps, corner clamps, wood clamps, etc.
- 2 days of cutting plywood
- 7 weeks of assembly, gluing, clamping, repeat
But they are a lot deeper than the Adires -- and heavier!
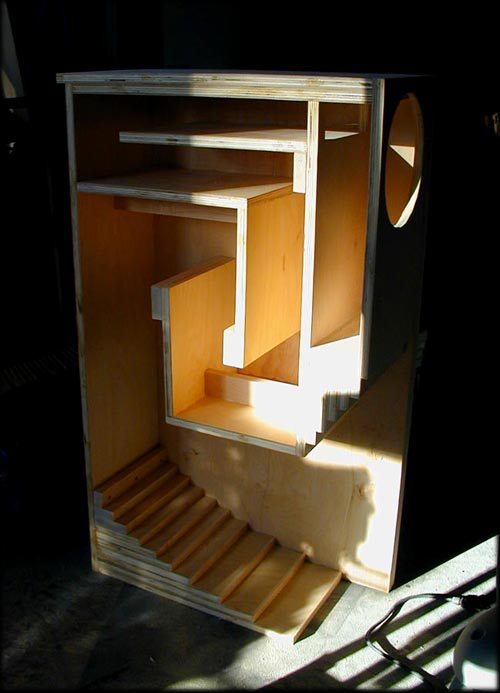
Construction Pictures
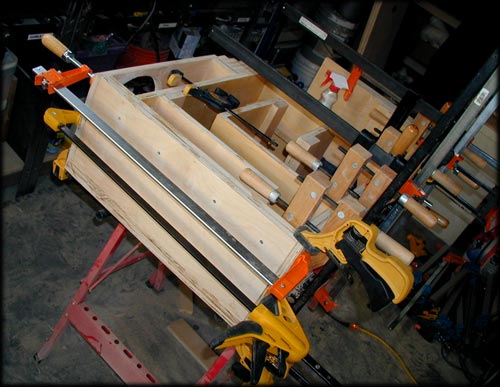
Better have a lot of clamps on hand for this project -
I used the 'free' side to help hold the interior walls in place as I glued up one side completely,
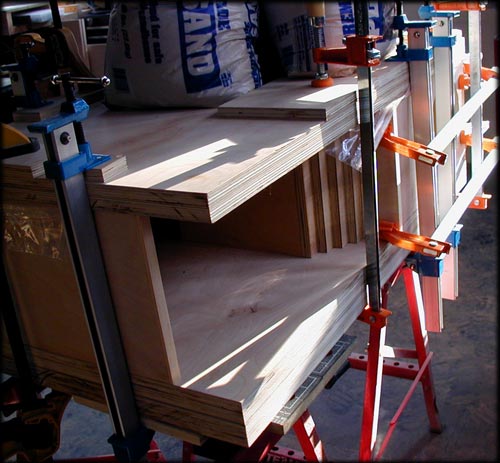
then applied oil finish to the interior before gluing the free side permanently
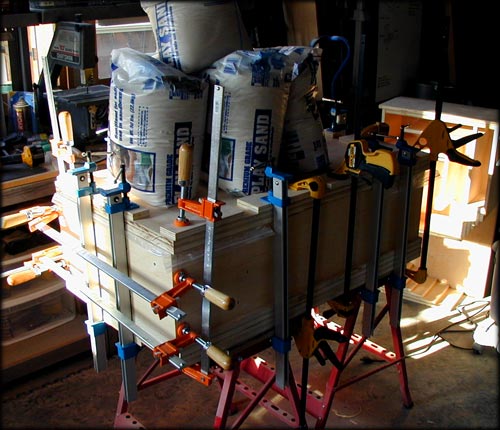
Bags of play sand to assist in gluing the double-thick side panels -
also added threaded rods through the cabinets in three places to help locate everything during the repeated glue steps
From the other side...
note the plastic film used to prevent the interior joints adhering to the free side until the final step
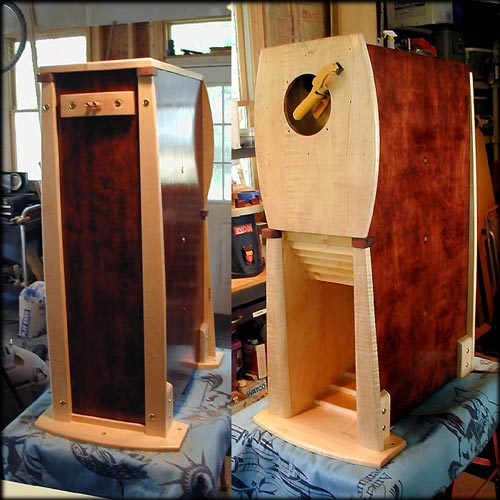
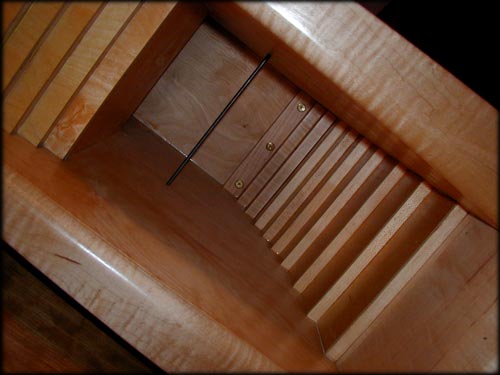
Getting close to hearing them now - checking the fit of the
figured maple baffle/soundboard and trim, with cocobolo widgets to separate the horn edges from the baffle